The Metadata Working Group (MWG) kicked off a Field of the Month initiative in October 2021. This project is intended to help ensure that we move forward with implementing last year’s recommendations for revisions to a variety of fields, many of which are still in the planning stage because they are dependent on metadata clean-up and/or we have not made a decision on our tolerance of metadata inconsistencies.
Each month for the next year, we will highlight one ScholarWorks field, rolling out revised help text on the work forms and guidance to campuses for required vs. optional metadata clean-up. This information will be shared at each Open Forum meeting (the first Friday of each month) as well as through subsequent email communications. Changes will also be tracked in the Metadata Change Log.
For additional background information, please consult the MWG slide deck from the October 1, 2022 Open Forum.
Batch Metadata Editing Instructions
If you are not yet familiar with the batch metadata editing process for ScholarWorks, please consult the training documentation created by David Walker.
Shortcut links to the more detailed updates on and instructions for each field are below.
Field #1: Title (December 2021-January 2022)
Overview
In 2020-2021, the MWG identified the need for additional clarity regarding capitalization practices for the Title field, which formerly advised users to capitalize the first word and any proper nouns, as shown in the screenshot below.
In keeping with the 2020-2021 recommendation of the MWG, David Walker has updated the Title field help text to allow for sentence case or title case capitalization. The help text now also links to a title case converter, as shown in the screenshot below.
Clean-up Recommendations (Optional)
The MWG has not identified clean up of existing Title metadata that is not in compliance with the above change (e.g., all caps) as a requirement. However, campuses are welcome to undertake this clean up, and two potential methods are detailed below. We encourage campuses to choose whichever method will best meet your needs, and you are welcome to adjust the process as you see fit. Based on initial testing, both methods handle diacritics well.
Option #1: Using the Title Case Converter
The Title Case Converter allows you to convert text based on the capitalization guidelines of various formatting styles. To facilitate batch editing, your campus may want to decide to use one style in all cases, regardless of disciplinary variations. Please consult the Which Title Case Style Should You Use? page for additional information.
Download the .zip file for your campus. Contact David if you don’t have that URL.
There is a separate CSV file within the .zip file for each data model/work form, of which we currently have four: dataset, educational resource, publication, and thesis. If your campus will be cleaning up Title metadata for more than just ETDs, you will need to complete the following clean up steps for each CSV separately.
For each CSV file, download it and save it locally. Then delete all fields (columns) except for id (column A) and title (column I).
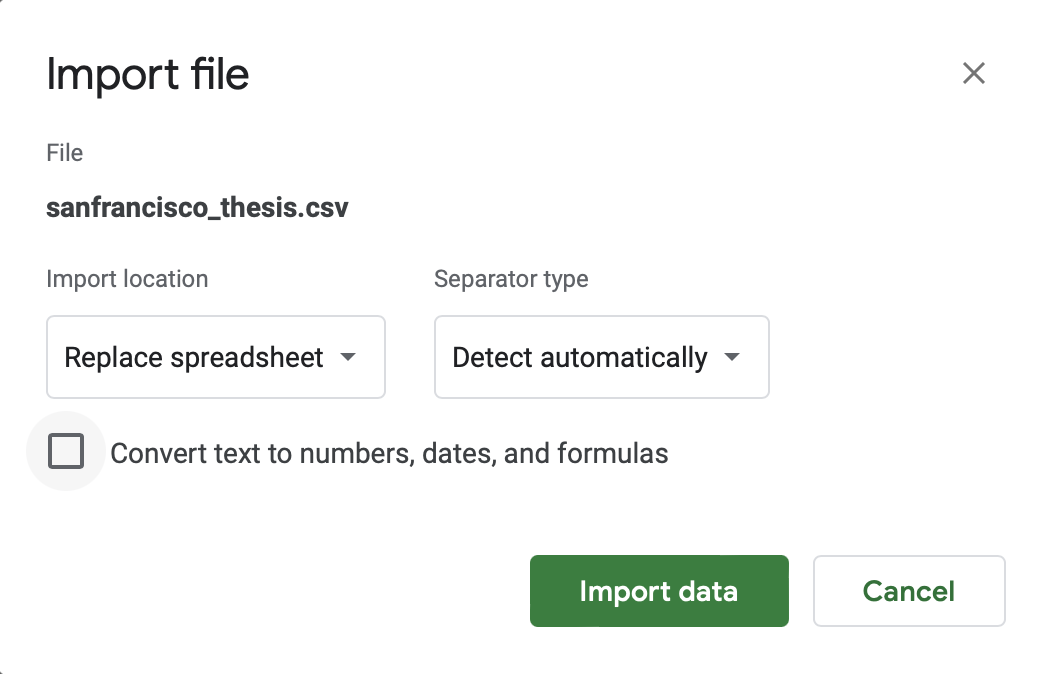
Then open a Google Sheet, click File > Import, click the Upload tab, and select or drag and drop the CSV file into the window. As shown in the screenshot below, be sure to uncheck the “Convert text to numbers, dates, and formulas” option before clicking “Import data.”
Then copy data from the Title field and paste it into the Title Case Converter. Note: The converter does not have an explicit character limit, but it seems to work best with 500 or fewer words, so you will probably need to do this in batches.
Select the title case style your campus has decided to use. If your titles are in all caps, you will also want to uncheck the “Keep Words in All Caps” option. Then click the “Convert” button.
Once the conversion is complete, you will be taken to a list of converted titles. Click the “Copy All” button.
Back in the Google Sheet, add a new Column C (you can name it “title_revised” for now) and paste the converted titles into that column as plain text.
You will probably want to do some spot checking, as issues can arise with acronyms, book/film titles, etc. Depending on the original formatting of your Title metadata, it may be helpful to refer to that column as you spot check. Note the following points.
Italicized text in the Title field will appear in the CSV export surrounded by <em> and </em> tags, as shown in the screenshot below. You can insert these tags manually to add italics, as needed.
Once the spot checking is completed, delete the original title column, and rename the “title_revised” column “title”.
Then download the Google Sheet as a CSV file and name the file exactly what the original CSV file was named (e.g., sanfrancisco_thesis.csv).
That’s it! You can send the CV file back to David. He will take it from there and give you the opportunity for a “sanity check” before finalizing the changes.
Option #2: Use the PROPER function
Using the PROPER function is a potentially faster method for converting all caps to title case, but it will capitalize the first letter of all words, including some that you would likely prefer to be lowercase (e.g., 2-3 letter words including articles and prepositions), so more manual clean-up may be needed.
Download the .zip file for your campus. Contact David if you don’t have that URL.
There is a separate CSV file within the .zip file for each data model/work form, of which we currently have four: dataset, educational resource, publication, and thesis. If your campus will be cleaning up Title metadata for more than just ETDs, you will need to complete the following clean up steps for each CSV separately.
For each CSV file, download it and save it locally. Then delete all fields (columns) except for id (column A) and title (column I).
Then open a Google Sheet, click File > Import, click the Upload tab, and select or drag and drop the CSV file into the window. As shown in the screenshot below, be sure to uncheck the “Convert text to numbers, dates, and formulas” option before clicking “Import data.”
Add a new column C (you can name it “title_revised” for now), and in cell C2, type =PROPER(B2) and press enter/return on your keyboard. This will convert the all caps text in B2 to title case.
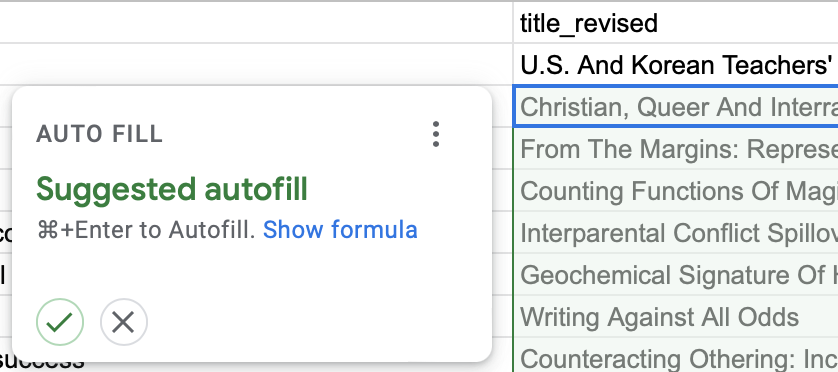
When prompted to autofill the rest of the column, click the checkmark button to do so.
Then copy the output of that formula and paste it as values in a new column (you can name that one “title_revised2” for now).
Please save your file at this point to avoid losing your work.
As noted above, this formula will capitalize the first letter of all words and lower case the rest, so spot checking will likely be required to identify those words that should be all caps (e.g., acronyms) and identify words that should not be capitalized (e.g., a, an, of, at).
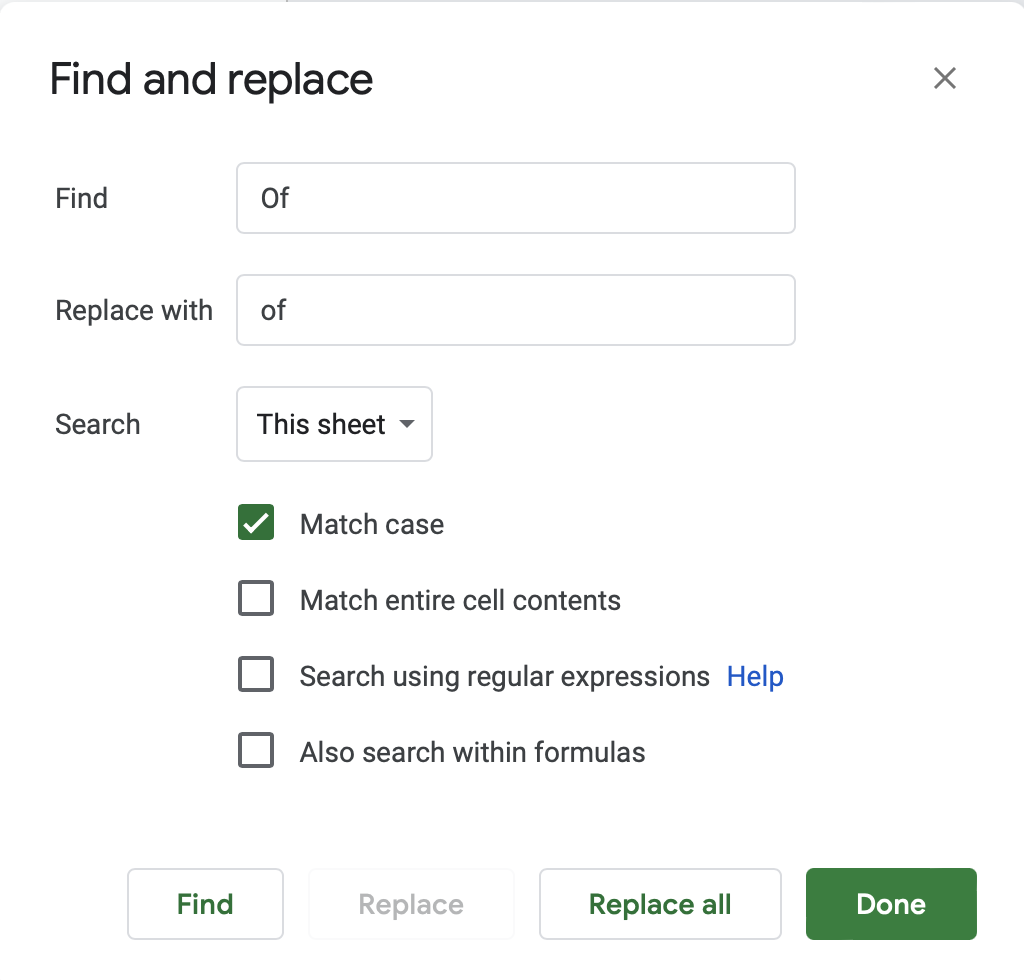
You may want to consider using find and replace to automate this process a bit, working from the title-revised2 column. For example, you could replace all instances of “ Of “ with “ of “ as shown in the screenshot below. Just be sure to include a space before and after the word in order to avoid replacing longer words that simply begin/end with the same letters. You will want to search “This sheet” and check the “Match case” option.
Once the spot checking is completed, delete the original title column and the “title_revised” column. Then rename the “title_revised2” column “title”.
Then download the Google Sheet as a CSV file and name the file exactly what the original CSV file was named (e.g., sanfrancisco_thesis.csv).
That’s it! You can send the CV file back to David. He will take it from there and give you the opportunity for a “sanity check” before finalizing the changes.
Field #2: Creator, Advisor, Committee Member (February 2022-March 2022) – DRAFT
Overview
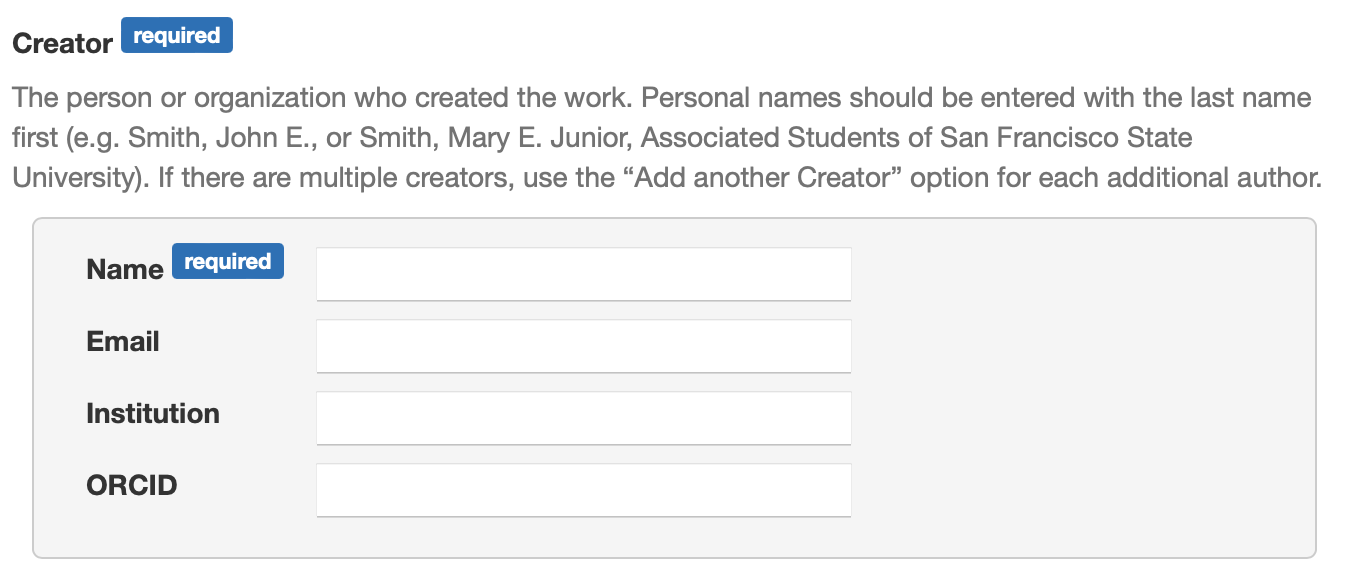
In 2020-2021, the MWG discussed feedback from ScholarWorks project managers regarding the need for more inclusive help text for the Creator field, which advised that names be entered “with the last name first,” followed by a comma and the first name and middle name or initial, if applicable. The help text also included Anglocentric examples, as shown in the screenshot below.
This led to further investigation into best practices for inclusive naming conventions, which centered on the fact that the terms “first name” and “last name” are not, in themselves, inclusive. Ultimately, the MWG recommended that any reference to those terms be removed from the help text and that names no longer be inverted, to avoid confusion. The group recommend that the help text be changed to “Enter the author’s name exactly as it appears on the title page of the work.”
San Francisco State University implemented this change on their Qualtrics self submission form for theses and dissertations in the spring of 2021 and found that the reference to “the title page” created confusion, so they adapted the help text as follows and incorporated an example (thanks to Devone Rodrigues for his help with this!): “Enter the author’s name exactly as it appears on the work (e.g., Jerome C. Baxter).”
Further testing of the revised help text at San Francisco State has yielded very straightforward self submissions, free of errors, so the MWG recommended that it be implemented for the Creator, Advisor, and Committee Member fields. This change should also be reflected in future updates to the help text for fields intended for names in other work forms.
[Need to add a screenshot of the new help text, once updated]
Clean-up Recommendations (Optional)
The MWG has not identified clean up of existing Creator, Advisor, and Committee Member metadata that includes inverted names (i.e., entered in Last, First M. format) as a requirement. However, campuses are welcome to undertake this clean up, and a recommended method is detailed below. This method will also work for any other fields that contain names (e.g., Contributor, Editor).
Download the .zip file for your campus. Contact David if you don’t have that URL.
There is a separate CSV file within the .zip file for each data model/work form, of which we currently have four: dataset, educational resource, publication, and thesis. If your campus will be cleaning up metadata for more than just ETDs, you will need to complete the following clean up steps for each CSV separately.
For each CSV file, download it and save it locally. Then delete all fields (columns) except for id (column A) and those name-based fields you intend to clean up, such as creator (column AY), advisor (AR) and committee_member (AS).
Add two new columns to the right of each field/column that you intend to clean up and then name those new columns as follows: [original field name]_revised and [original field name]_revised2.
Select what is now cell C2 (the first blank cell in the first of the _revised columns you’ve added), then click on the formula bar, and copy and paste the following function: =RIGHT(B2,LEN(B2)-SEARCH(",",B2)-1)&" "&LEFT(B2,SEARCH(",",B2)-1) and press enter/return on your keyboard.
Then fill the formula down the entire column. Please consult Excel’s documentation for additional guidance with that.
Then copy the output of that formula and paste it as values in what is now column D (i.e., your _revised2 column for that field).
Please save your file at this point to avoid losing your work.
Working from what is now Column D, spot check the output of the formula for error. If you find any errors, please correct these within Column D.
Particular attention should be paid to names that include suffixes or more than one comma, as these will probably need to be corrected manually.
If you come across “#VALUE!,” that should mean that the original name in Column B was already in the correct order. In a case like that, select the D cell containing “#VALUE!,” press your backspace/delete key, and then copy the name from the corresponding cell in Column B and paste it into the D cell.
Once the spot checking is completed, delete Columns B and C. Then remove “revised2” from the heading of what was Column D (now Column B).
Repeat the above steps as necessary for additional fields, changing the reference points in the formula as needed to refer to the correct column.
When finished, be sure to save the CSV again, and then send the file back to David. He will take it from there and give you the opportunity for a “sanity check” before finalizing the changes.


