Service Days & Hours
Lockers are available for patrons to pick up library materials 24/7
Users Eligible for Service
Current students, faculty and staff
Purpose
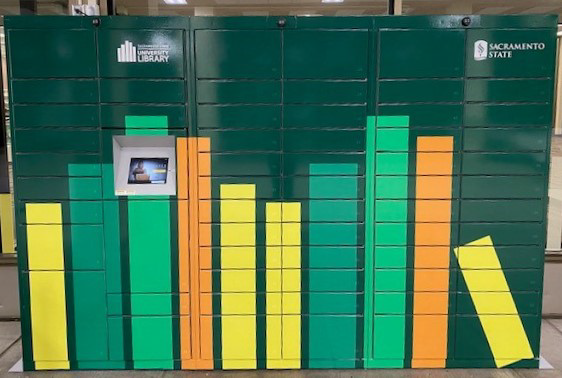
In November 2020, the Sac State University Library launched a contactless locker pick up service. This service allows for patrons to pick up requested library materials at their convenience from Pickup Lockers located outside the Library’s main entrance.
Requesting
Policy
Request up to 8 local items at a time
Request up to 20 Resource Sharing (ILL/ CSU+) items at a time
Allow 3-5 business days for processing (local)
Allow 10-14 business days for processing (RS)
No appointment required for pickup
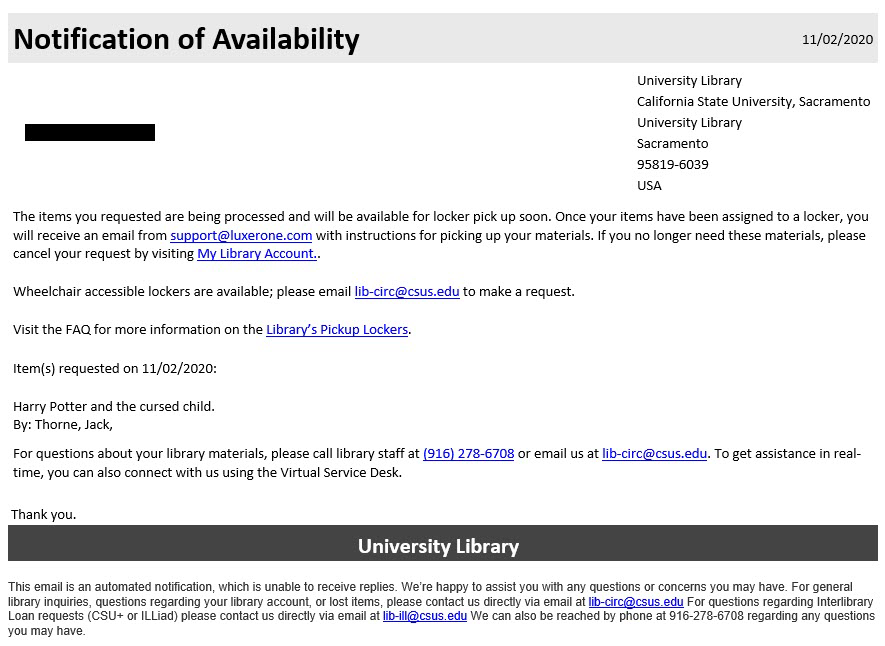
Wheelchair accessible lockers are available upon request
In-person help not available
Items will be removed from lockers after 3 day
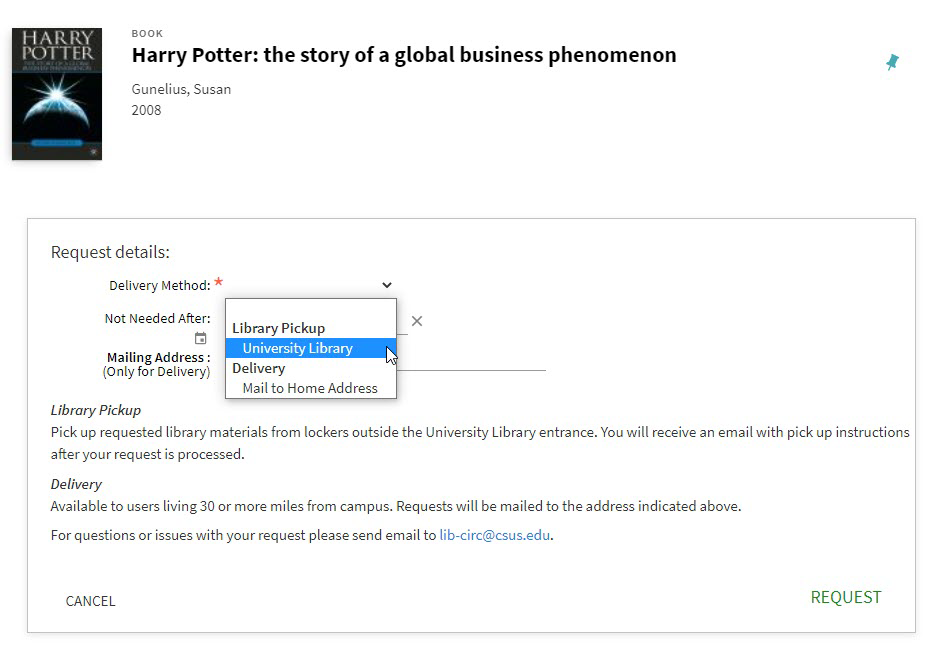
Request Form (local
Patrons submit book requests via OneSearch and select University Library as the delivery method for library pick up.
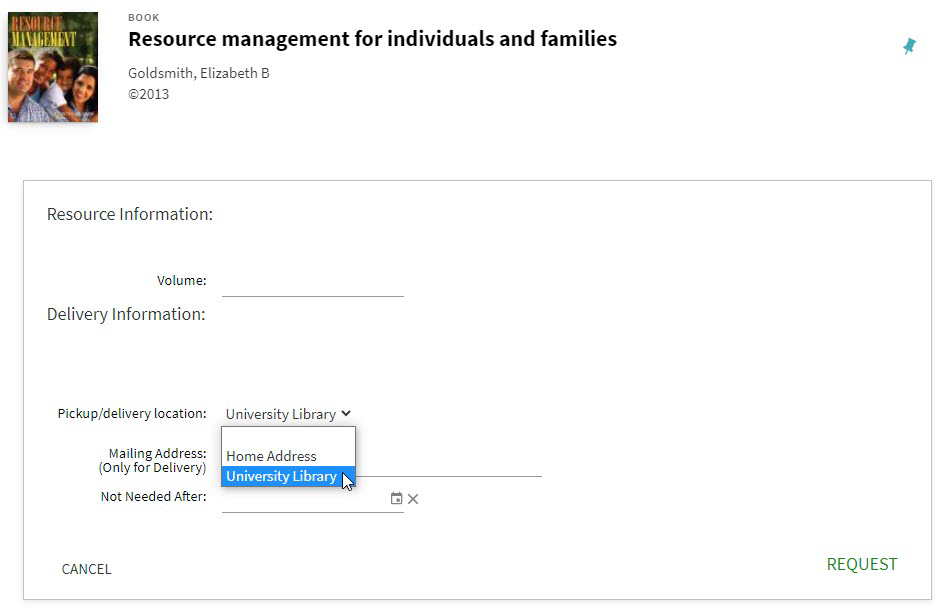
Request Form (CSU+)
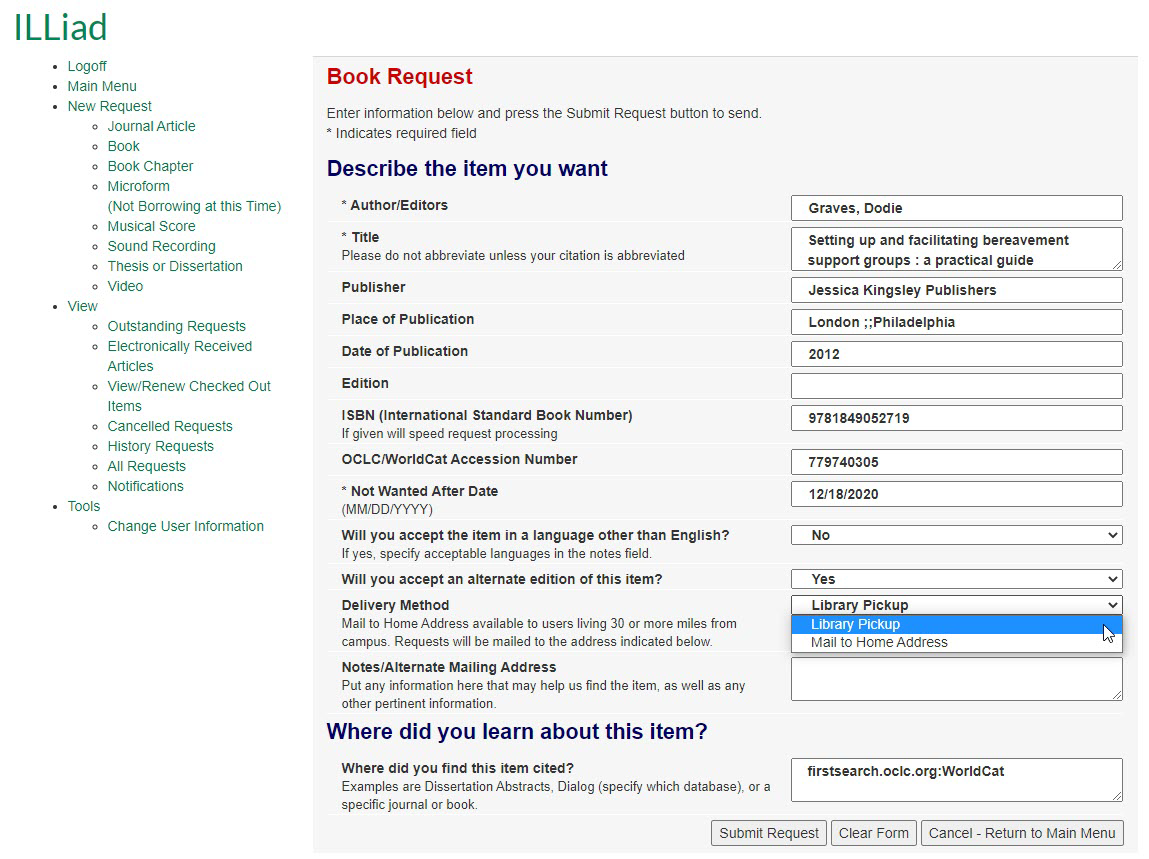
Request Form (ILLiad)
Processing Requests
Reviewing Requests in Alma
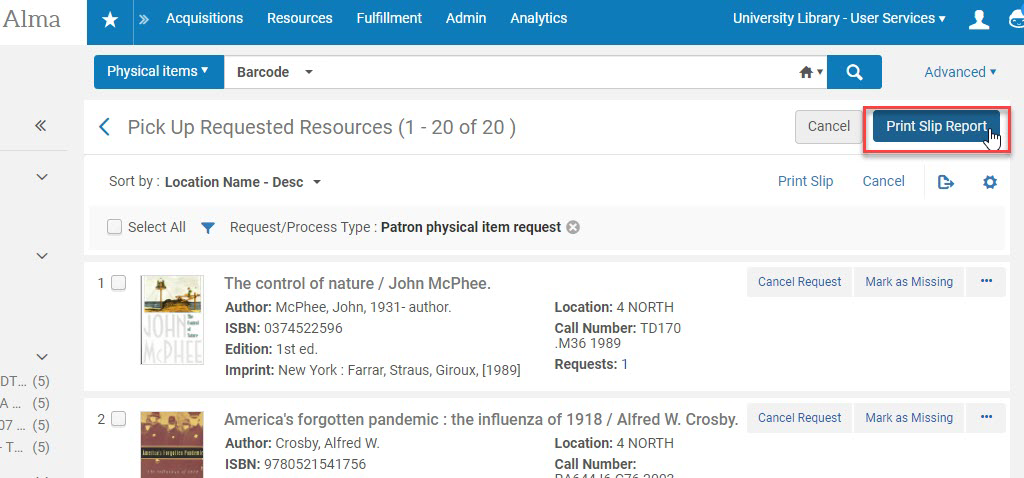
View the Print Slip Report in Alma to determine which requests are Library Pickup and will need a Print Slip printed for item retrieval and *hold shelf staging.
*With the implementation of Pickup Lockers, the library will only utilize an Active Hold Shelf if all lockers are occupied. Requested materials will remain on the Active Hold shelf until a locker is available.
View Print Slip Report
Navigate to Fulfillment > Pick from Shelf > Patron Physical Item Request > Click on Print Slip Report
Download the Print Slip Report
Open the report in Excel to view which requests are for Library Pickup. Print a Print Slip for each request with a University Library Pickup Location.
Important: you will need to review this list for requests with a Home Delivery pickup Location with addresses within 30 miles from campus. If a request has been submitted as Home Delivery and the address is within 30 miles from campus, switch the request to Library Pickup in Alma before moving on to the next step, Printing Print Slips.
Switch a Request from Home Delivery to In-Person Pickup
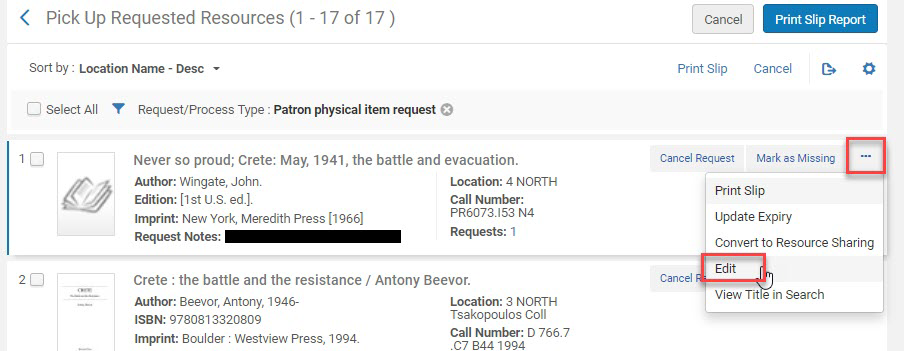
From the Pick from Shelf list in Alma, filter so only Patron Physical Item Requests are listed. Locate the request you need to switch to Library Pickup and click Edit from the item menu.
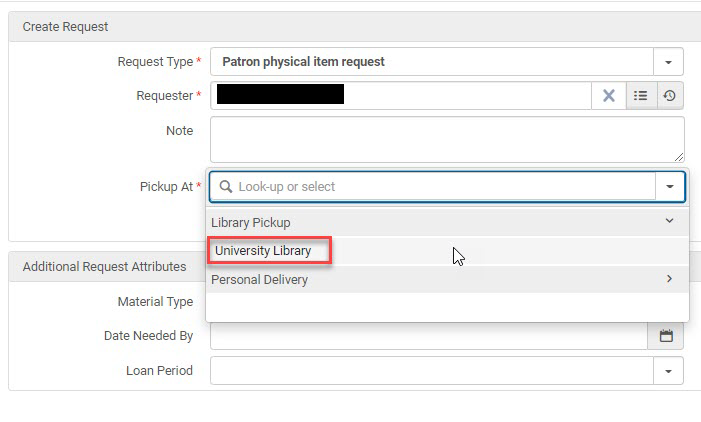
Select In-Person Pickup > University Library. Click Submit to save the change.
Printing Print Slips
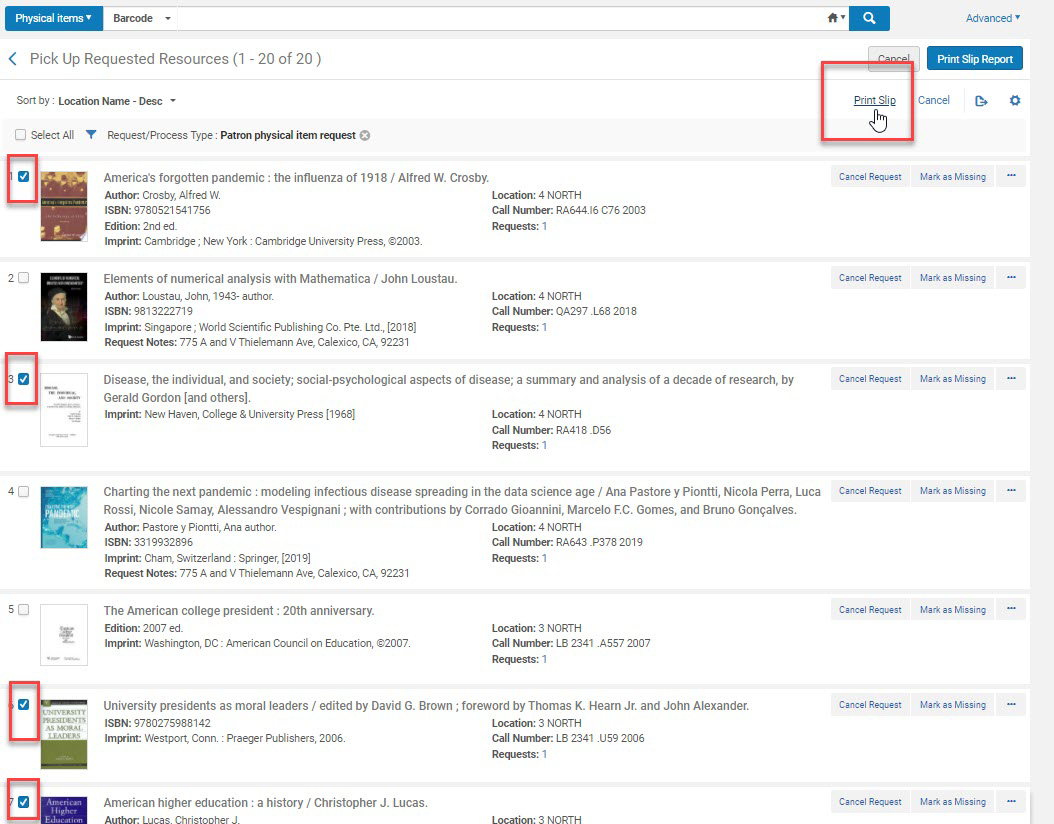
In Alma, return to the Pick from Shelf list, filtered to Patron Physical Item Request, and print a Print Slip for each Library Pickup request. You can do this by selecting each Library Pickup request and then click Print Slip. Check the Select All box to print all the print slips (Library Pickup and Home Delivery) if you will be processing both types of requests at the same time.
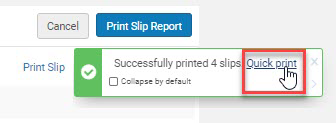
Click on Quick Print after clicking Print Slip.
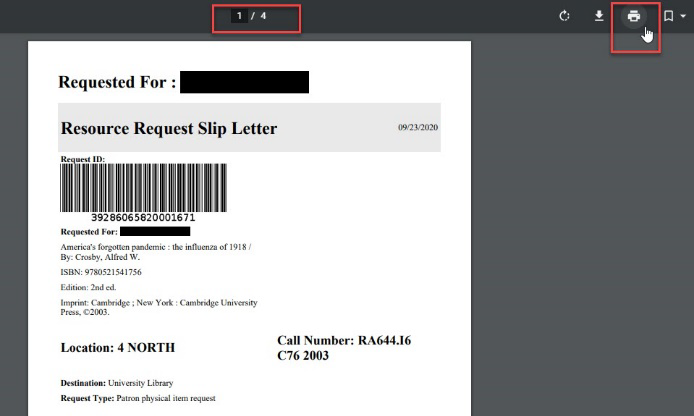
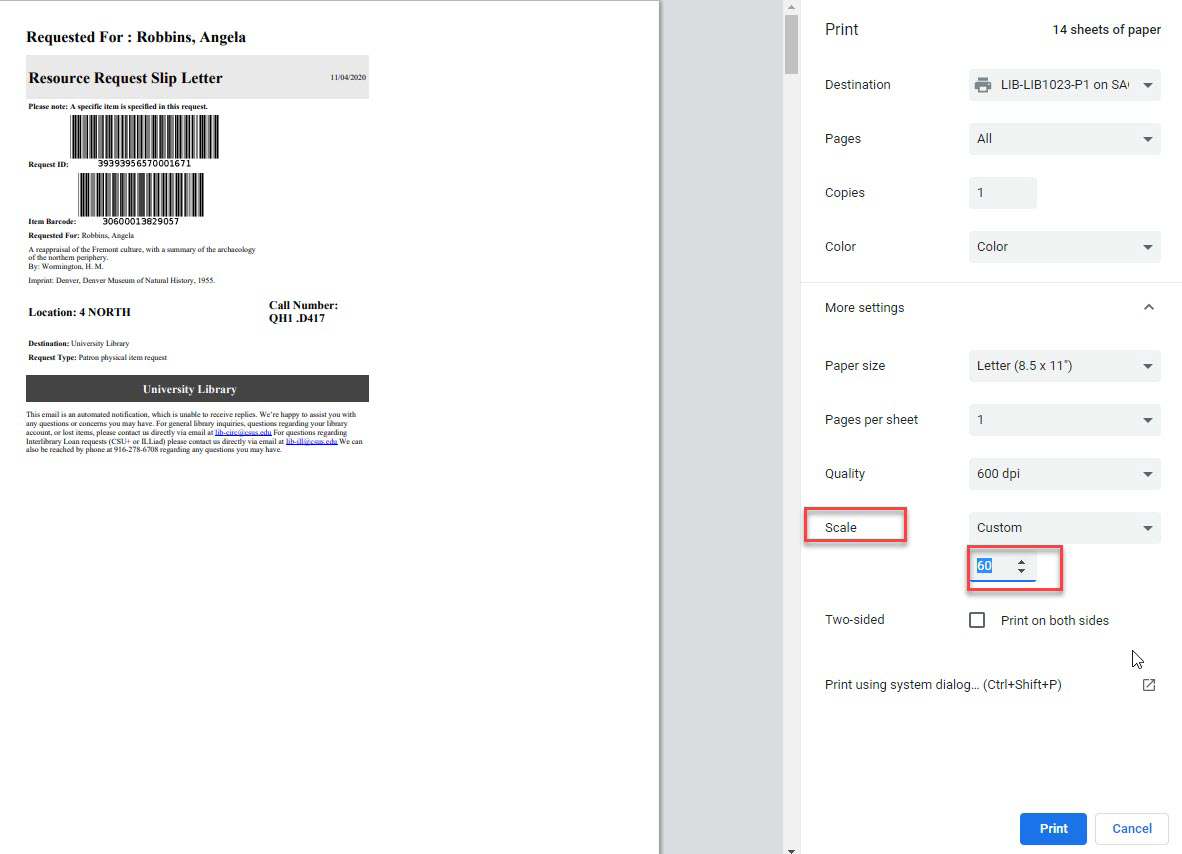
Review the PDF of all the Print Slips before printing. It’s helpful to reduce the scale (60 is adequate) so the print slips are smaller and fit easily inside the books. You will need to cut the print slips to size after printing.
Select Print and make note of the printer and destination so you know where the Print Slips will print.
Print Slips will be used to identify materials and which patrons to check them out to after they have been pulled from the stacks. The Print Slips should always stay with the requested items to prevent lost or misplaced items. Print slips will also allow patrons to verify they have received the correct items when retrieving from a locker.
Resource Sharing Requests
Resource Sharing staff will receive and process ILL and CSU+ requests as usual. Once processing is complete, items can be brought up to 1 North Service Desk for delivery to a locker following the procedures outlined below.
Adding Materials to Lockers
Access Luxer One Building Manager
Link: https://app.luxerone.com/manager/managers/login
Username:
Password:
Check for patrons with a locker already assigned
If you have requests for patrons who already have a locker assigned to them, you will add the new materials to that locker. In this case, you do not need to ‘scan-in’ the materials first; you can skip to checking the item out to the patron.
Navigate to the Lockers tab in Building Manager, and download either the PDF Audit Worksheet or the CSV Audit Worksheet. Print the worksheet for easier review and organization of materials.
Review the list and mark each patron and locker number you will need to add materials to.
Add materials to a locker already assigned to a patron
Check the materials out to the patron in Alma
Gather the materials you need to deliver to a locker and go to the lockers. Using the touch pad, login in as carrier using the building manager master code:
Select the locker you need to open to add materials, click open locker. Place materials inside and close the locker.
Continue down your list until all materials have been added to the appropriate lockers.
Alternatively, if you are only working with a few new requests and need to check if a patron already has a locker assigned to them, navigate to the Recipients tab in Building Manager and search for the patron. If they have a locker assigned it will show under Orders History. Note the locker number and proceed with step 1 as described above.
Adding new requests to a locker
Before adding new requests to lockers, you will need to check locker capacity to ensure there are enough vacant lockers. In Building Manager, navigate to the Lockers tab and review available lockers. From the image below, you can see there are 15 available lockers. Depending on staff resources, materials may be added to lockers every day or as often as needed.
Check materials out to patrons in Alma. Insert instructions for returning library materials into one book for each patron. Do not put materials in a bag before placing items in a locker. As a courtesy, you can add a bag to a locker if the patron has requested several items. The patron can choose to use the bag or not.
Gather all the materials you need to deliver to a locker and go to the lockers. Using the touch pad, log in as carrier using your assigned carrier code. View carrier codes in Building Manager by selecting the Carriers tab. Carriers are identified with First and Last initials.
After you are logged in as carrier, search for a patron’s name. Using last name is the best way to search. Note: searching by Sac ID is not available.
Select the appropriate locker size or next available locker size.
Place items in locker and close the locker.
Continue with the next locker delivery for the next patron you have materials for.
Adding a Patron to Luxer One System Manually
Patrons who make a book request through OneSearch/Alma will be automatically added to the Luxer One database. It may be necessary to manually add a patron to the Luxer One system, however, this should rarely happen.
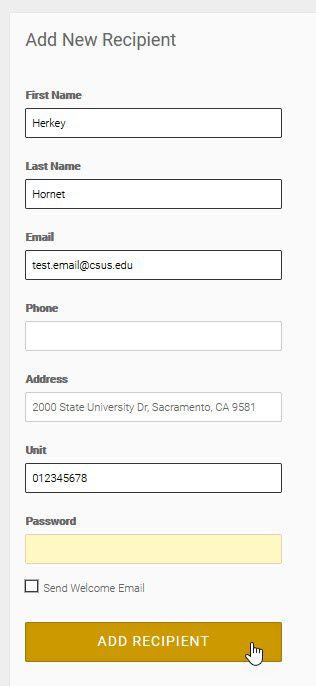
From the Recipients tab in Building Manager, enter patron information in the Add New Recipient form on the right side of the screen.
Name
Sac Email (from Alma)
Unit = Sac ID (from Alma)
Uncheck ‘Send Welcome Email’ box. We are NOT sending welcome emails.
Click Add Recipient
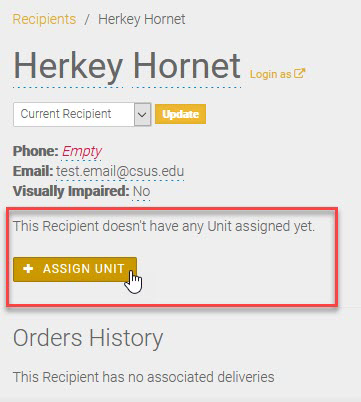
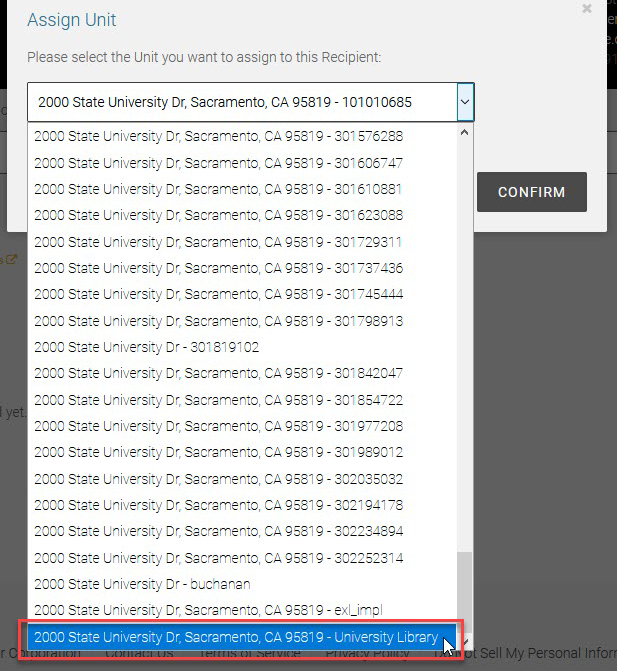
On the next screen, you will see a message that says ‘recipient does not have any unit assigned yet.’ Click ‘Assign Unit’ and select University Library at the bottom of the list. Click ‘Confirm’ then click the Recipients tab to get back to the main list of recipients. The patron you just added should appear at the top of the list.
When to Use the Active Hold Shelf
Staff will utilize the Active Hold Shelf in Alma when new requests have been scanned-in and all lockers are occupied. Alternatively, if you know all lockers are occupied, you can wait to scan-in items until lockers become available (doing this leaves the requests on the pick from shelf list and patrons are not notified). Use your best judgement. Scanning items in will remove the item from the pick from shelf list and place it on the Active Hold Shelf. Once items are scanned in, patrons are automatically notified via Alma that their request is being processed.
Scan In Items & Prepare for Hold Shelf
After items are located and pulled from the stacks, use the Scan In function in Alma to place the items on the Active Hold Shelf. Items will not be checked out to patrons at this step. The pop-up notice below is what you should see after the item is scanned in.
Place each Print Slip inside its corresponding item so patron names are visible.
Place all items on the physical hold shelf using a rubber band for multiple items for the same patron so all items stay together. Items will not expire from the hold shelf. When lockers become available, items will be checked out to patrons and delivered to a locker.
Reassign a Locker to the Same Patron
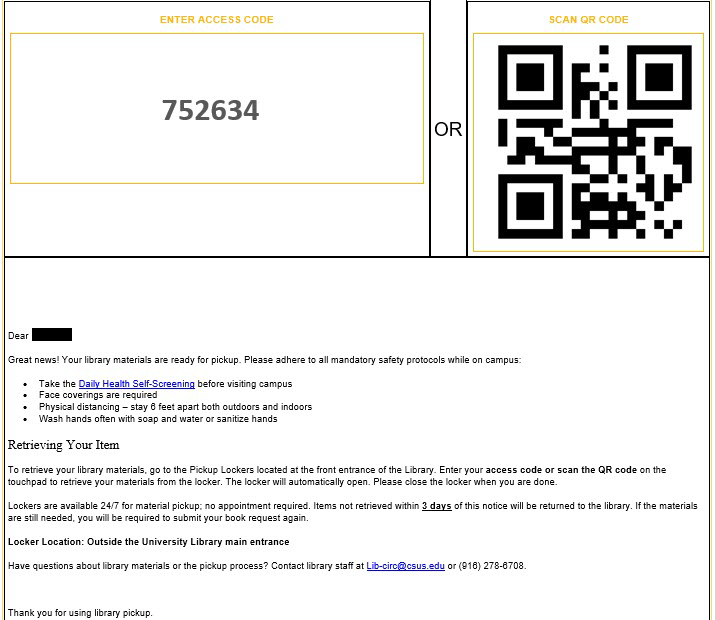
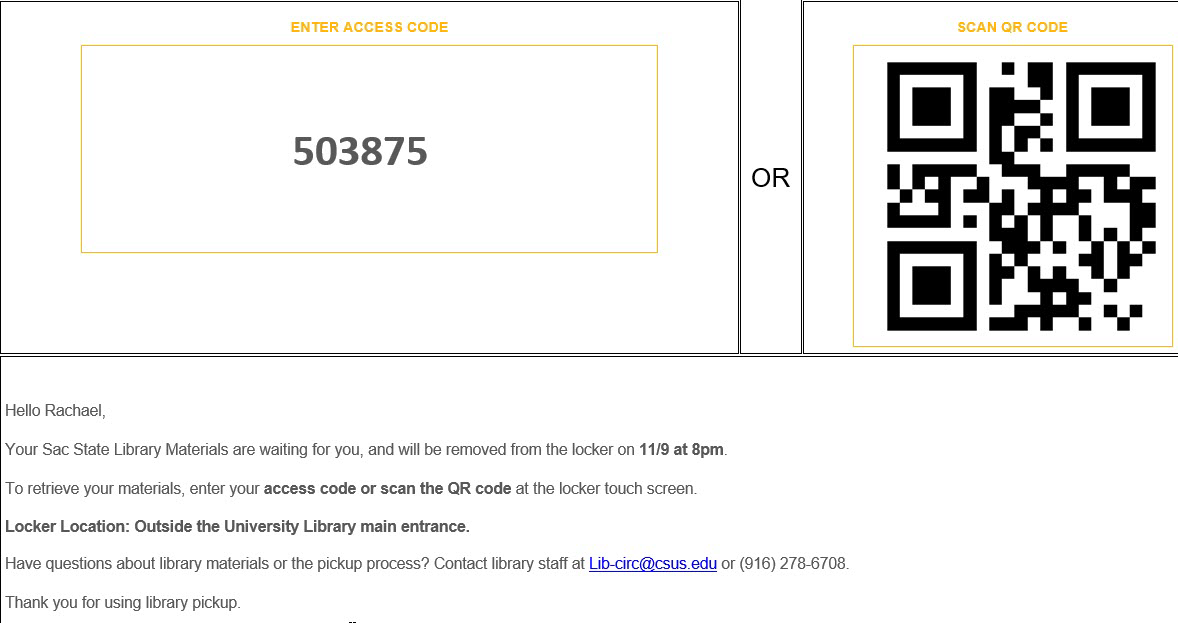
It may be necessary to reassign a locker to a patron. For example, we’ve placed items in a locker and the patron contacts us to extend the time to pick up because they are out of town and will return after the locker expires. Reassigning a locker deactivates the original access code and QR code and delivers a new access code and QR code for the same locker number.
To reassign a locker to the same patron, follow the steps below under Locker Audits. The only difference is you will search for the same patron instead of locating a new patron to assign the locker to. The patron is not notified via email that the original access code has been deactivated, so make sure to state this when communicating with the patron.
Expired Lockers
Lockers will expire after 3 days. Patrons will receive a reminder email at 48 hours, and a final removal letter after 3 days. Once items have been removed, patrons will have the option to schedule a pick up using the LibCal scheduler. Patrons will have 7 days to schedule a pick up. After 7 days items will be returned to the library and made available for other patrons to request.
Note: Access codes remain active until items are actually removed from lockers.
When a locker expires, its status automatically changes to Return Requested in Building Manager. Alternatively, you can manually expire a locker by setting the status to Return Requested in the Orders tab. Select ‘Return to Sender’ from the drop-down menu in the Orders tab to change the status to Return Requested.
When a locker’s status is Return Requested, items should be removed from the locker and staged for 7 days on the Not Picked Up staging shelf. Patrons will receive an email from support@luxerone.com with the option to return the materials or schedule a pick up using the LibCal scheduler. Patrons will have 7 days to schedule a pick up. It may be possible to re-deliver items to a locker after they have been removed if space is available and there are no new requests waiting for a locker. After 7 days items will be returned to the library and made available for other patrons to request.
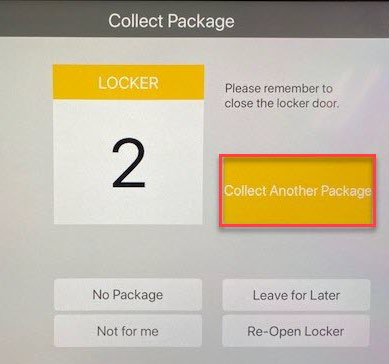
To remove items from expired lockers, use the touch pad and enter the carrier code of the person who delivered the items to the locker. From the image below, you can see the initials of the original carrier (DA).
Locate the carrier code form the Carriers tab in Building Manager.
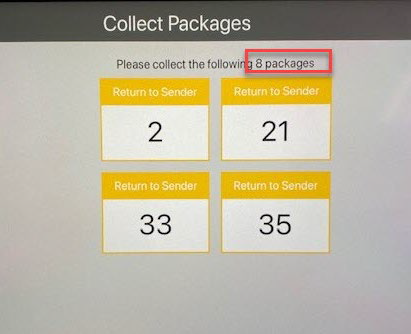
Select from the list of expired lockers you need to empty. Only 4 lockers at a time will display on the touch screen, and you cannot scroll to select a specific locker. Collect the packages one at a time and they will be cleared from the screen.
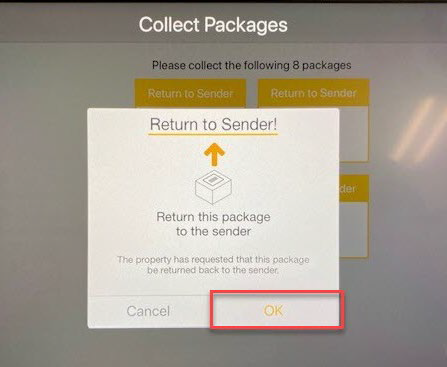
Return to Sender notice pops up, click OK.
Locker will automatically open, remove the items from the locker and close the door.
Select ‘Collect Another Package’ to continue, and repeat until all the expired lockers have been cleared.
When expired lockers are cleared out using the original carrier code, they are automatically marked ‘Picked Up’ in Building Manager and set to Empty status. Alternatively, if you clear a locker manually using the master carrier code to open the locker, you must mark the locker ‘Picked Up’ in Building Manager to change its status to Empty.
Locker Audits
A full locker audit should be done at least twice a week to ensure items are being picked up, to clear out expired lockers, and to check for locker malfunctions.
Note: before performing a locker audit, it is best to first process any expired (Return Requested) lockers so they are removed from the audit worksheet.
From the Lockers tab in building manager, download and print the PDF Audit Worksheet.
Take the audit worksheet with you to the lockers to perform the audit.
Using the touch pad, login using the building manager master code:
Open all lockers, then close each locker with no materials inside.
Starting with the first locker on the audit worksheet, look inside the locker to verify materials inside belong to the patron on the audit worksheet. If this is true, close the locker and continue checking all the lockers on the worksheet.
If the items in a locker do not belong to the patron listed on the audit worksheet, make a note on the worksheet and reassign the locker to the patron whose items are in the locker.
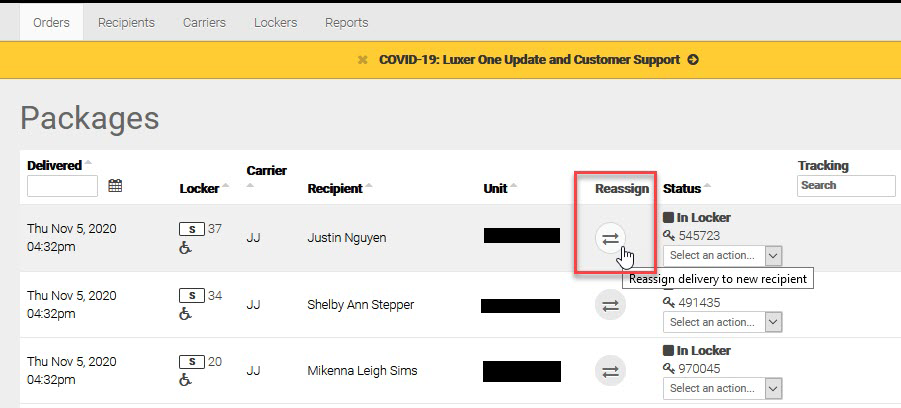
To reassign a locker to another patron, navigate to Orders tab in Building Manager, locate the patron who currently has the locker assigned to them, click on the reassign arrows.
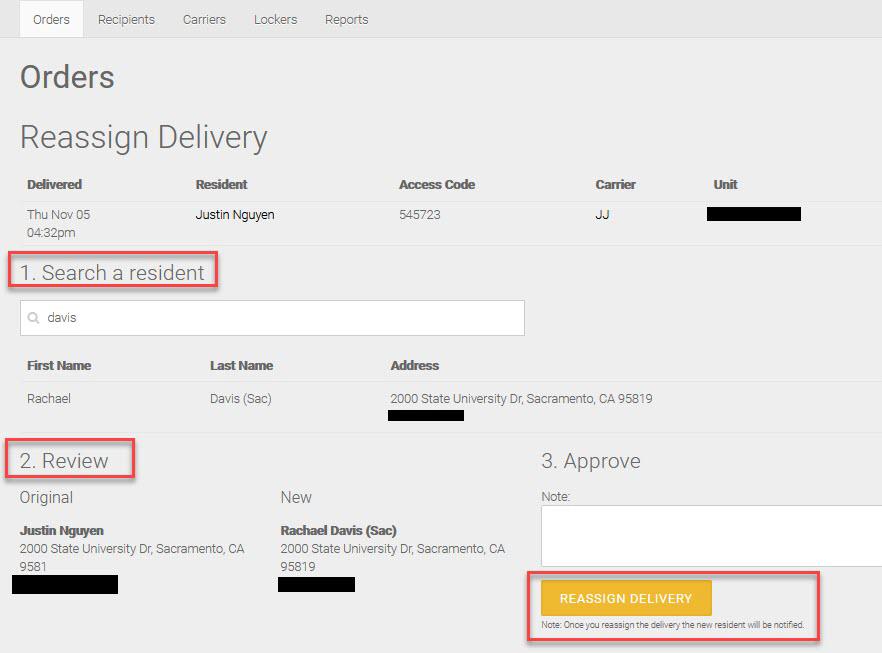
On the next screen, search for the recipient you want to reassign the locker to. Select the patron and confirm details. Click ‘Reassign Delivery’ to complete the task.
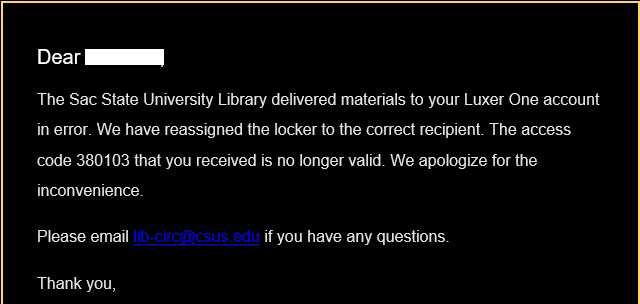
When a locker is reassigned, both patrons receive an email. The patron no longer assigned will receive an email stating that their access code has been deactivated. The patron newly assigned will receive an email with a new access code and instructions for picking up.
If a locker on your audit worksheet is actually empty, make a note on the worksheet and mark that locker as ‘picked up’ to make it available.
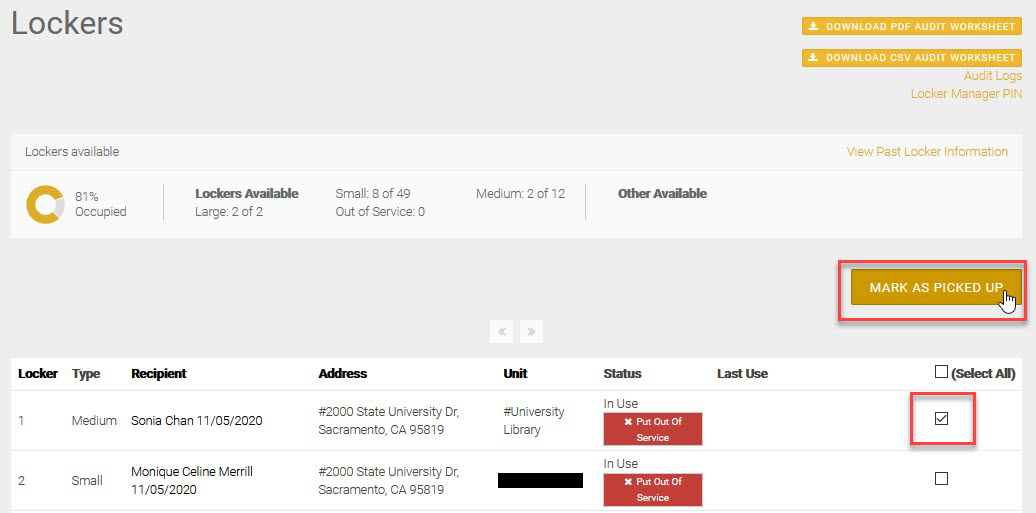
To mark a locker ‘picked up’ navigate to Lockers tab in Building Manager select the check box for each locker you want to mark as picked up, then click Mark As Picked Up.
Luxer One Patron Account Management
Assigning wheelchair accessible access
Patrons may submit a request for access to a wheelchair accessible locker by emailing lib-circ@csus.edu.
Patrons can also create an account with Luxer One and apply this account setting themselves.
For Luxer One account password assistance, direct patrons to support@luxerone.com or the Luxer One website (https://www.luxerone.com/support/) for online chat support and FAQs.
To add wheelchair accessible access for a patron:
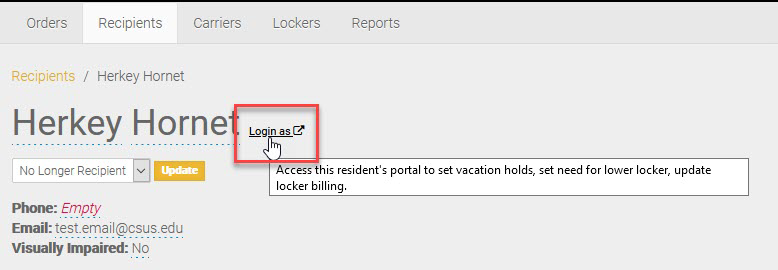
Navigate to Recipients tab in building manager and select the recipient you want to edit.
Click on ‘Login as’ to access the patron’s account.
Click ‘Settings’ tab.
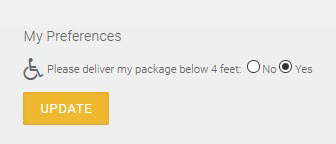
Scroll to the bottom of the page to ‘My Preferences’ and select the radio button Yes to deliver packages below 4 feet.
Click ‘Update’
